For an project I needed to have multiple VLAN’s on my Synology NAS (216+ II). There was an need for 4 VLAN’s on the NAS. It’s an test NAS so is already has DSM 7.0 (41222) installed on it. On DSM 6 I once tried to map some VLAN’s on an instance, but this just doesn’t work nice with them DSM software. It bugs and only shows the interface with the highest VLAN ID. Today I’ve tried it again with DSM 7, and to my surprise it worked quite flawless. So my idea of starting an blog was then confirmed and so here is my first blog post on TechBlik!
The steps for adding VLAN’s
Step 1: Configuring network interface
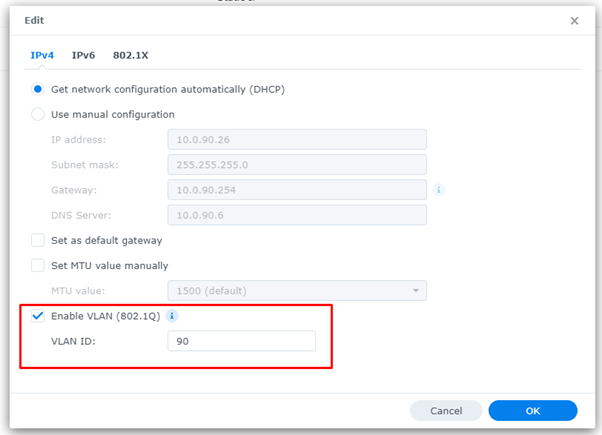
We first go to Control panel > Network > Network Interface > LAN-edit. Then we will “Enable VLAN (802.1Q)” Then in de “VLAN ID” field we will enter our desired VLAN ID (the first one, the rest comes later).
Step 2: Enabling SSH
To enable we need to go to Control Panel > Terminal & SNMP > Terminal > Enable SSH service. It’s possible to change the SSH port for security purposes.

Step 3: Accessing the NAS by SSH
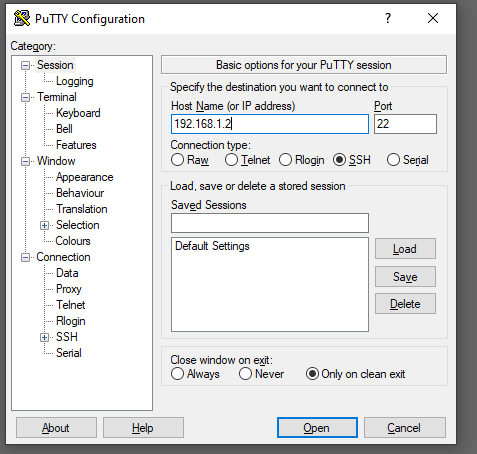
To access the system you need an SSH client Putty for example. I personally prefer the use of MobaXterm (Free version). When you have an client open fill in the IP or on CLI (Command Line Interface) type “ssh admin-user@192.168.1.2 -p 22 (or other port)”

Step 4: Gaining root access
When we are logged in we will need to get root access. This is because only root is allowed to make changes in system files. We can become root by issuing the following command “sudo -i” followed by the admin password. At this stage we have an shell on root level.

Step 5: Creating interface config files
Now we need to copy an existing interface file and change the name and contents of this file. We first need to move in to the following folder: “cd /etc/sysconfig/network-scripts“. In this folder are all the interface config files stored (ls to show contents of folder). In this folder the following file will be present ifcfg-ETH0.90. This name is built up in ifcfg-(Name of the NIC).(VLAN ID)
So: LAN1=eth0 and VLAN90=90 makes: ifcfg-eth0.90

Step 5.5: Copying and modifying interface config files
First we need to copy an existing config file “cp ifcfg-eth0.90 ifcfg-eth0.10” then we open the copied file with “vi ifcfg-eth0.10” then for changing the file you need to press the [i] key, this opens the –Insert– modus in VI. Then we need to change the first line “device” here we need to change (in my case) the device from “eth0.90 to eth0.10“. Also the “VLAN“ line needs to be changed to the desired VLAN ID. When done changing the file the procedure for exiting VI is “[ESC] :wq!”, Escape to stop editing : to open the option line and w (write) q (quit) ! (override).


#VLAN network interface
DEVICE=eth0.10
VLAN_ROW_DEVICE=eth0
VLAN_ID=10
ONBOOT=yes
BOOTPROTO=dhcp
Step 6: Finishing and rebooting
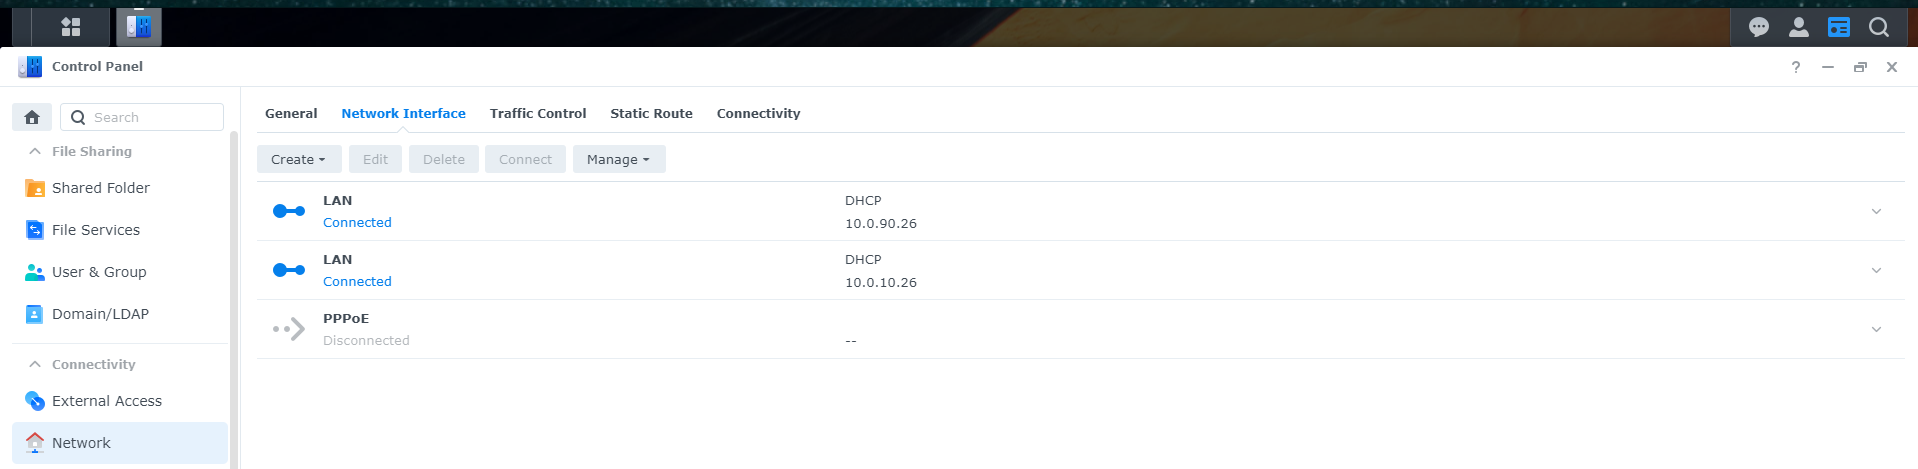
When all files are changed and created we need to reboot the NAS. You can do this by typing the command “reboot” on the CLI. When the reboot is finished the interfaces will appear in the DSM settings.
Update: As metioned by Partick in the comments an sudo /etc/rc.network restart is sufficient.
And then we are done!
Have fun with you DS an VLAN interfaces!
It’s possible to change network settings in the network control panel. Those settings will be nicely changed in de VLAN configuration file so this will not give problems. On a soft reset (4sec reset button hold) the network settings will be restored and our VLAN setting and config files will be removed!
Hi,
Nice article.
I have an interesting issue with this though.
Services on the “initial” VLAN (vlan 90 in your article) get unstable.
copying files via CIFS to the IP on VLAN 90 is unstable
a ssh connection to the IP on vlan 90 keeps disconnecting.
I did a full NAS reset – and this behavior is persistent.
If I however executes
ip link add link eth1 name eth1.200 type vlan id 200
ip link set dev eth1.200 up
It seems to be stable.
Thanks for the explanation! Restart is not required, just /etc/rc.network restart with ofcourse sudo will suffice.
Does anyone know how to change the name how it is displayed in the GUI? I have now 4 bond 1’s…
Does this also work with openvswitch enabled?
I’m running some VMs off my Synology and would love to have multiple VLANs to work with.
Hi Dave,
Your comment was on hold so I didn’t get a notifiaction.
As far as I know it does work, Although that was with DSM6.
Maybe you have already tested it, I would love to now the outcome!
sudo /etc/rc.network restart drops the ssh connection and thus locks you out of the Synology. A reboot is better.
Hello,
thanks for this article, works pretty nice !
I have tried to keep te native vlan in place. But that seems impossble… or not.. or…
At first I added a regular IP static in GUI to LAN 2 to manage the DS.
After that, added an IP to LAN 1, no 1.Q yet, and is working all ok.
Then i added VLAN 5 and 112 to LAN 1 , which is eth0, the cfg’s look as follows:
DEVICE=eth0.5
VLAN_ROW_DEVICE=eth0
VLAN_ID=5
ONBOOT=yes
BOOTPROTO=static
IPV6INIT=off
IPADDR=172.16.50.6
NETMASK=255.255.255.248
——————————————
DEVICE=eth0.112
VLAN_ROW_DEVICE=eth0
VLAN_ID=112
ONBOOT=yes
BOOTPROTO=static
IPV6INIT=off
IPADDR=192.168.180.6
NETMASK=255.255.255.248
—————————————
I kept the original eth0 file in place. After a restart i can see the vlan interfaces, .1Q enabled and reachable.
The untagged is however not visible in the GUI, but it IS reachable and pingable etc. So that is a bit strange, agree ?
It is usable, but not visible and cannot be included in firewall rules. Can anyone confirm this is (ab) normal behavior ?
This is indeed (ab) normal behaviour, DSM is not sure how to handle de extra vlans. If I remember correctly, when only one vlan is created it is shown in de gui when there are more it just “flips”.
I’m not sure how we can tackle the firewall issue, need to look into that.
Was this resolved?
Would anyone know if one can also add an untagged VLAN? I tried about everything and could not get it to work… It seems like everything needs to be tagged, but my switch only allows untagged VLAN 1, never tagged, unfortunately… And it insists on having its management interface on untagged VLAN 1, so I must have my management network on this VLAN 1 :/ Note to self: don’t buy QNAP switches in the future.
Hi Ronny,
Normally the default interface for example eth0 is for using the untagged network traffic. As Gert-Jan describes the interface will maybe disappear in the DSM configuration GUI but will be functioning. What maybe also is worth trying to add an interface eth0.1,
I’m not sure how DSM is going to handle this, so please beaware that an softreset (network settings and admin password) is necessary.
I’ve you have any further question I’m happy to answer them (or maybe at least something in the right direction).
BTW shame of the QNAP switches….
Hi Wesley, thanks for your valuable reply!
I’m using a “bond” (2x 10gbit nic in failover mode) but in fact it should not make any difference to the principle you explained. Judging from what you wrote, I now removed the bond and started from scratch in the correct order:
(1) I created a bond without VLAN with the IP in VLAN 1 untagged,
(2) and then through SSH created an additional tagged VLAN 30 on the same bond,
(3) and then still through SSH added yet another tagged VLAN 1 on the same bond, with the exact same IP as in step (1).
(4) did “sudo /etc/rc.network restart” and the two VLAN’ed IP’s instantly appeared in DSM’s list of network interfaces without any need to refresh, both listed as “Bond 1”.
And yes, everything worked!
Note that most people will not need step 3. The NIC created in step 1 will not be visible in DSM (as you correctly noted), but I do need it in the iSCSI network bindings in SAN Manager. The network interface created in step 3 is not actually working, but it *is* listed (and DSM believes it’s working), so I could then assign its IP in iSCSI network bindings (SAN Manager), and my iSCSI connections are working just fine.
So thanks again, it didn’t work earlier when I had already created a VLAN bond and then tried adding an IP to the parent bond itself, so I guess the order in which one creates the interfaces does matter. Creating first the bond itself without VLAN, and then adding VLANs through SSH to the same interface, works beautifully.
For completeness, here are my config files:
# the below bond is the result of creating an “active/standby” bond through DSM with a manually configured IP address without VLAN (step 1 above). It is listed in DSM only until the VLAN bonds are defined, then this one will disappear from sight…
sudo cat /etc/sysconfig/network-scripts/ifcfg-bond0
DEVICE=bond0
ONBOOT=yes
BRIDGE=””
BOOTPROTO=static
IPV6INIT=off
BONDING_OPTS=”mode=1 use_carrier=0 miimon=100 updelay=100″
USERCTL=no
IPADDR=172.16.30.4
NETMASK=255.255.255.0
# I created the below file /etc/sysconfig/network-scripts/ifcfg-bond0.30 in step 2 above
DEVICE=bond0.30
VLAN_ROW_DEVICE=bond0
VLAN_ID=30
ONBOOT=yes
BOOTPROTO=static
IPADDR=192.168.30.2
NETMASK=255.255.255.0
IPV6INIT=off
# I created the below file /etc/sysconfig/network-scripts/ifcfg-bond0.30 in step 3 above
DEVICE=bond0.1
VLAN_ROW_DEVICE=bond0
VLAN_ID=1
ONBOOT=yes
BOOTPROTO=static
IPADDR=172.16.30.4
NETMASK=255.255.255.0
IPV6INIT=off
An additional hint: if someone is struggling with an ethx.y file reappearing shortly after one had deleted it in SSH, I found that doing “sudo ip link delete ethx.y” before “sudo del ethx.y” prevents it from coming back.
Anyone having any luck using:
a BOND between multiple ETH connections
OVS enabled (as it is needed for VMM)
Then using multiple VLANS as well?
I can use OVS over a BOND, but then I’m not successfull in getting multiple VLANS to work